I've seen a few posts recently asking how to find more junk journal supplies without spending money -- so I decided to see what you could get from a single book.
It turns out you can make quite a bit!
This one story book yielded 26 big envelopes, 10 small envelopes, a big journal cover, rounds to make flowers, tags, dimensional bows and more -- here's a look at what I made in an afternoon from just one book!

How to Make Junk Journal Supplies from a Single Book
Choose a book to start with. Mine is a 1970s fairy tale book that had all the right stuff for this project:
It was oversized.
It was damaged but not mildewed or otherwise unsuitable for crafting
It has thick paper, colorful illustrations and interesting text
It was free! I got this from the freebie bin at Second and Charles (they usually have some free books outside and I snatched this one right up.
Here's a peek inside and out before I took it apart:


I liked the color and the oddball illustrations -- and the stories are from Arthur Rackham, AA Milne and others. (There's a reproduction on Amazon if you want to see it pre-cutting in more detail, but I doubt it has the nice thick vintage paper the original does)
First I pulled the pages with the most interesting illustrations (and the best placement) for big envelopes. I cut them out using the free template found in this post, just print, cut and trace to make your own.
I ended up with 24 envelopes!

These are the perfect size to add ephemera, use for swaps or add letters or journal cards. They are also ideal if you like to send mail art! I like the plain text ones but used a lot of the fun illustrated pages, too.
Next I made smaller envelopes with some of the pages that had interesting designs but the placement wasn't right for big envelopes. You can find my free templates to make smaller envelopes here.

Circles for Tags and Projects
I had some paper leftover from each page of envelopes and didn't want to discard it so I used the huge 3.5 inch hole punch to cut rounds:


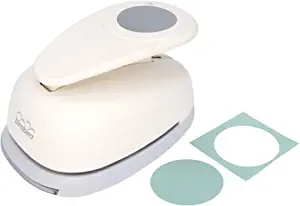
I do not like cutting a million circles by hand so these big punches are perfect! Find this one here, and I also love the 2" for garlands and 3d flowers. I like that you can flip the punch over to precisely position the image before cutting and that its heavy duty enough to do a bunch of pages at once. I cut these from the dust jacket and interior pages - -this is definitely a no-waste project!
3D Paper Bows from Scrap Paper

These envelopes will be for sale and I wanted them to look cute, so I used some of the extra pages for bows! There are 8 envelopes and a cute bow per pack -- and I made the bows using the free printable from last year found here.

I printed out the free bow printable I made last year (find it and complete directions here) and then used one as a template to cut the book pages. I aged a few and then assembled, they turned out super cute!
Here's the free 3d bow printable if you want to use it as a template to make your own:

Here's the bow with the envelopes but you could use them anywhere they won't get squished!

Upcycled Tags from Book Pages
I also made some tags from random pages -- I tore them using a metal ruler, aged the edges and then added reinforcements -- these can go into any pockets or pages or be further embellished. I had a lot of leftover pages so will probably make more of these:

I also made a few smaller journal covers, this one is my favorite :

Making a Journal from an Old Book Cover
Lastly, I wanted to do something with the cover.
I had picked up the Cinch machine at Michaels, an impulse buy but it ended up being just right. I was originally planning to use a crop o dile to make holes then remembered I bought this! Its the Cinch machine, here it is on Amazon, and it is my new favorite paper supply!

I took the covers I had already removed and just trimmed the raw edge with scissors.
I punched holes along the edges in the front and back cover, and in some random pages -- I also added some lined paper I had on hand.

It made tidy holes in all of them -- so I just had to add the wires and assemble!

Here is the finished book!

Opened up it has a mix of book pages, blank pages and lined pages, mainly because that was what I had on hand:

I loved how it turned out! The Cinch was actually a little intimidating -- its been in its box since December but I figured this was a free book so there wasn't much to lose. I was shocked at how easily this came together, the book took about 5 minutes to make.
Here's a quick look at what I came up with, but I want to revisit this idea with another book -- it was a lot of fun and I ended up coming up with more ideas for the next one!
You can find more upcycling projects on the blog, I have linked them below!